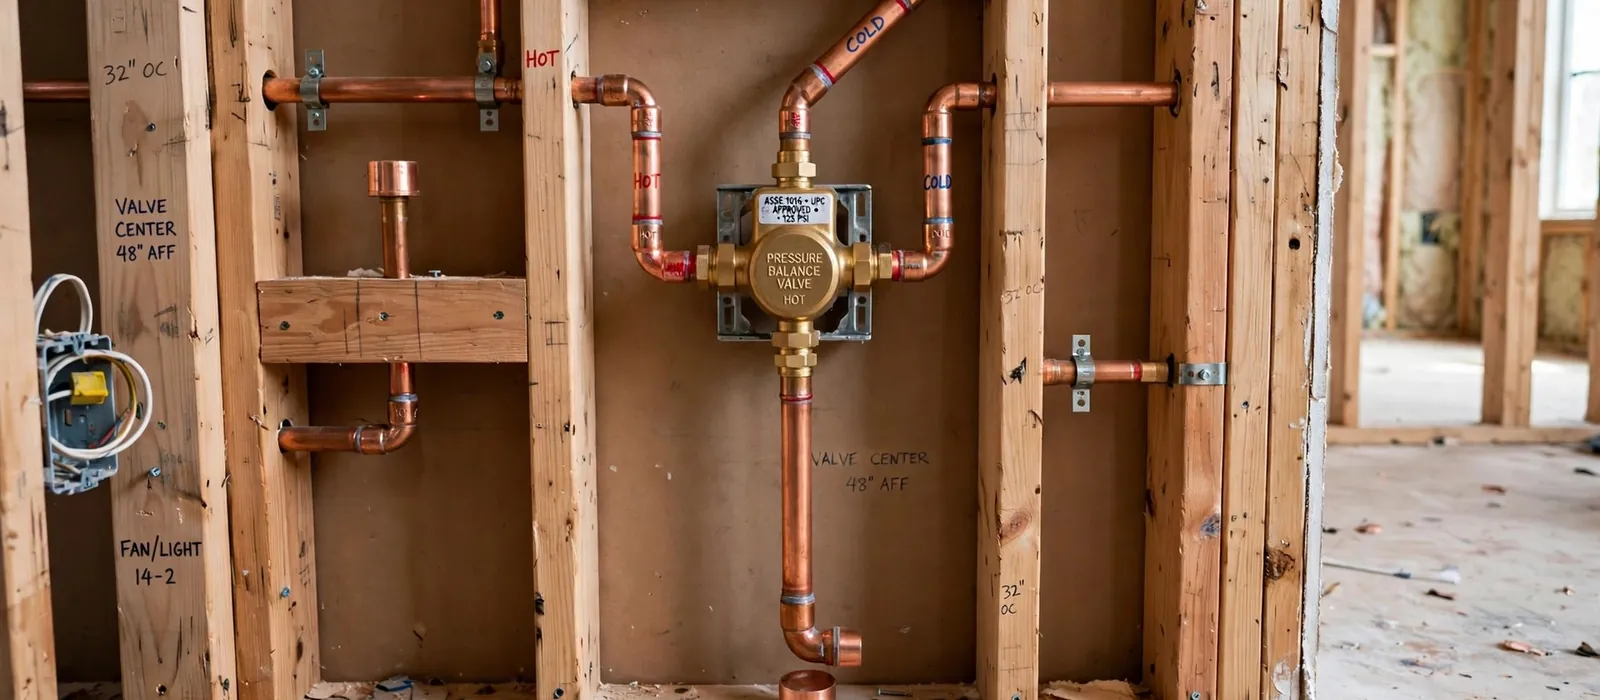
Installing shower plumbing means setting a mixing valve in the wall, running hot and cold supply lines to it, connecting a drain with the right slope and a trap, and pressure testing everything before the wall is closed. Most of the skill is in the order of the work. The rough-in goes in first, and the tile and trim come last.
This guide covers the four rough-in stages in the order a plumber does them. It also shows where a do-it-yourself job usually goes wrong, and where a licensed plumber in Independence, KY is the safer choice. Read it before you open a wall, even if you plan to hire the work out.
What counts as shower plumbing
A shower has three plumbing systems that meet behind one wall. The supply side brings hot and cold water to a valve. The valve mixes them and sends water up a pipe to the shower arm. The drain side catches the water at the floor and carries it away through a trap to the main drain line.
Each system has its own parts and its own failure points. Supply lines are usually copper, PEX, or CPVC in half-inch sizes. Drain lines are usually PVC or ABS, and a shower drain is commonly 2 inches wide. Knowing which system you are working on tells you which tools and tests apply.
Before you cut anything
Shower work touches the main water supply and the house drain, so a few safety steps come first. Skipping any of them turns a small mistake into a flooded room.
- Shut off the main water valve and open a low faucet to drain the lines.
- Confirm no electrical cable or switch box runs through the wall you are opening.
- Check the floor framing below the shower for joists you cannot cut.
- Pick the valve and trim kit first, because the valve brand sets the rough-in depth.
- Measure the drain location against the joists before you buy the drain body.
- Wear eye protection when cutting pipe and gloves when using primer and cement.
- Never work near a gas line or gas appliance vent without a licensed plumber.
The four rough-in stages in order
Stage one: frame and mark
Open the wall to bare studs and set blocking for the valve at the height you want, often about 28 to 38 inches above the floor. Mark the shower arm height, commonly near 78 inches, and the center of the drain.
Stage two: set the drain
Fit the drain body into the floor opening, glue the trap and the 2 inch branch to the house drain, and keep the pipe sloped about a quarter inch per foot toward the main line. Fill the trap and leave the drain open for the water test.
Stage three: run the supply
Mount the valve on its blocking, then run half-inch hot and cold lines to its marked ports. Add a riser pipe from the valve up to a bracketed elbow where the shower arm will come out of the wall.
Stage four: test before closing
Cap the shower outlet, pressurize the supply, and watch a gauge for at least 15 minutes. Plug the drain and fill the pan with water to check for leaks. Only then do you hang cement board and tile.
Need a hand with the rough-in?
Call our 24/7 line to book a plumber for your shower.
Which parts go where
This table sums up what each part does and the mistake that most often goes with it. Keep it beside you during the rough-in.
| Part | Job | Common mistake |
|---|---|---|
| Mixing valve | Blends hot and cold and controls flow | Set too deep or too shallow for the trim kit |
| Supply lines | Carry water at house pressure to the valve | Loose joints that were never pressure tested |
| Riser and shower arm | Lift water to the head | Elbow not fixed to blocking, so it shifts when the arm is tightened |
| Drain body | Catches water at the floor | Wrong height for the pan or liner |
| P-trap | Holds a water seal against sewer gas | Missing, dry, or glued crooked |
| Branch drain | Moves waste to the main line | Too flat or too steep a slope |
If you are replacing a tub shower combination, the same table applies. The tub spout adds a second outlet to the valve and a diverter that sends water to the head.
Why valve depth matters more than most people expect
Every shower valve has a stated depth range from the face of the framing to the front of the valve body. The trim kit only seals properly when the valve sits inside that range once tile or board is in place. A valve set too deep leaves the handle sloppy, and one set too shallow cannot be covered by the trim plate.
Plumbers use a depth gauge or the plaster guard that ships with the valve. Add the thickness of the cement board, mortar, and tile before you fix the valve to its blocking. Getting this wrong means opening a finished wall, which is the costliest correction in the whole job.
Permits and license checks for Independence homeowners
Kentucky's Division of Plumbing oversees plumbing in the state, and homeowners can ask it about permits and verify a plumber's license. Permit rules vary, so ask the Kentucky Division of Plumbing or the city before you start work in Independence, not after the wall is closed.
That timing matters because an inspector may want to see the rough-in with the pipes still exposed. Asking early also tells you whether a homeowner can do the job or whether it needs a licensed plumber. If you hire out the work, look up the plumber's license with the Division before you sign anything.
Source: Kentucky DHBC Division of Plumbing permit form (state agency)
What makes a shower plumbing job cost more or less
No two shower installs cost the same, because the work behind the wall differs so much from house to house. These are the drivers that move the bill, with no dollar figures since each home is different.
New location or old location
Reusing an existing valve and drain is far simpler than moving a shower to a new wall, where new drain and supply runs are needed.
Access to the drain
A shower over a basement or crawl space is easy to reach from below. A shower on a slab or over a finished ceiling needs cutting and patching.
Pipe material and condition
Old galvanized or brittle supply lines may need to be replaced back to a healthy section before a new valve can be connected.
Valve type
A basic single handle valve costs less to set than a pressure balanced or thermostatic valve with extra ports and a more careful install.
Floor and pan work
A tile shower needs a sloped pan and waterproof liner, while a prefab base drops in faster.
When to call a licensed plumber
Call a plumber if the drain must move, if the supply pipes are galvanized or corroded, or if you cannot get to the joists below. Those jobs involve cutting structure and connecting to the house sewer, where an error can leak for months before anyone sees it.
A plumbing installation visit can cover the whole rough-in. If you only want a part fixed, a toilet and fixture repair call can often handle a nearby fixture at the same time. Our licensed and insured plumbers give a clear price before work starts, and our 24/7 emergency line covers a pipe that fails mid-job.
If the new shower drains slowly, the problem may sit in the line, not the fixture. A drain cleaning visit clears it. For a shower in Elsmere or Erlanger, see our pages for plumbers in Elsmere and plumbers in Erlanger.
Frequently asked questions
A simple swap of a valve and drain in an open wall can be done in a day. Moving a shower to a new wall takes longer because drain and supply runs must be built and tested. Tile and cure time add more days afterward.
Many homeowners can swap a valve in an open wall if they are comfortable with soldering, PEX crimping, or CPVC cement. Drain work and any change that touches the main line is easier to get wrong. Know your limits and call a plumber when unsure.
Most shower drains use a 2 inch pipe with a trap of the same size, sloped about a quarter inch per foot. Local requirements can differ, so confirm with the Kentucky Division of Plumbing or the city before buying parts.
Yes, it is wise. The Kentucky Division of Plumbing oversees plumbing in the state, and homeowners can ask it to verify a plumber's license. Permit rules vary, so ask the Division or the city about your project at the same time.
A pinhole leak behind tile can run for weeks and rot framing before a stain appears. A 15 minute pressure test and a drain fill test are cheap compared with tearing out finished tile.
Sources and official contacts
Local details in this guide come from the sources below. They are the right offices for questions about the water and sewer systems or plumbing rules.
- Northern Kentucky Water District, customer service
Owns the service line from the main to the meter and publishes an annual water quality report.(859) 578-9898 - Kentucky Division of Plumbing
Oversees plumbing in the state, including the State Plumbing Code that sets the standards for our work. Verify a plumber's license or ask about permits here.(502) 573-0397